Professional tile laying on walls and floors requires precision and accuracy, and using a tile leveling system allows you to achieve an ideal result without distortions and uneven seams. SVP ensures the stability of the tiles during the setting of the adhesive and speeds up the work process, especially with large volumes of cladding.
Surface and tool preparation
High-quality installation begins with careful preparation of the work surface and selection of tools.
Basic preparation steps:
- Clean and level the surface. Remove dust, old coatings, and bumps.
- The primer. Increases the adhesion of the adhesive and increases the durability of the cladding.
- Selection of tools. A tape measure, a construction level, a tile cutter and a notched trowel ensure the accuracy of the work.
- Preparation of glue. Follow the manufacturer's instructions and apply a double layer: on the surface and on the tile.
- Checking the tiles. Before laying, make sure that there are no chips or defects.
Good preparation minimizes errors and speeds up tile installation.
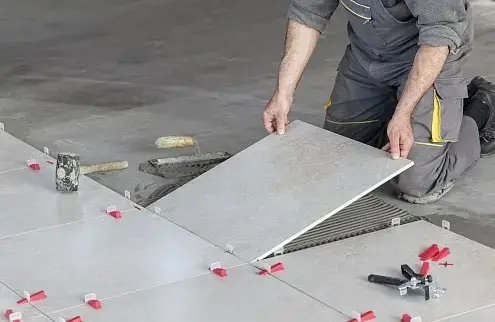
The stages of laying tiles using SVP
The tile leveling system makes the smooth laying process fast and reliable.
Step-by-step process:
- Start from the corner of the room. The first tile becomes a reference point for all subsequent ones.
- Install the SVP clips. Place them in the corners of the slabs to fix and align.
- Insert the wedges. They ensure the same level of all plates and prevent misalignment.
- Check the seams. Remove excess glue to keep the seams clean.
- Let the glue set. Do not load the surface until the mortar has completely set.
- Remove the SVP elements. The wedges can be reused for the following jobs.
Following these steps, you can achieve a smooth and aesthetic surface without additional adjustments.
Calculation and selection of the alignment system
The number of clips and wedges depends on the tile size and surface area, which is important for efficient operation.
Selection recommendations:
- Determine the number of fixation points. For large plates, fewer clamps are required, for small ones, more.
- Select the appropriate type of SVP. Consider the thickness and material of the tile.
- Purchase a stock. It is better to have 10% clips in reserve to prevent shortages.
- Evaluate the tools for installation and disassembly. Special pliers or hammers will make the job easier.
- Consider the area of the object. For large surfaces, it is better to use robust and reliable systems.
Correct