When building summer cottages, such as sheds, greenhouses, gazebos or small buildings, one of the most important stages is laying the foundation. The durability of the entire structure is based on its strength and reliability. A lightweight foundation is a wonderful option for such tasks, as the foundation will not require large amounts of waste, and the use of reinforced reinforcement with a diameter of 10 mm will significantly protect the value of the base without harm. Do you need to buy 10 mm reinforcement, please rush to metal base Stillar in Kiev, which offers a wide range of materials with delivery.
What types of foundations are suitable for light spores?
For light summer cottages, a number of types of foundations will be used. , which you can build with your own hands:
- Stritch foundation of shallow embedment:This is one of the most popular types of foundations, which is a closed stitch along the perimeter of the future. It is buried 40-60 cm into the ground and will provide sufficient resistance for spores, such as a barn, crawl space or garage. 10 mm reinforcement is ideal for reinforcement, the impact on the foundation will be very small.
- Partial foundation:This type of foundation is made up of a number of supports (pillars), placed at key points underneath I wake up - in the corners and along the perimeter of the load-bearing walls. The same foundation is optimal for light structures, such as gazebos or verandas, and is often used for wooden frames. 10 mm reinforcement is used to strengthen concrete piles, preventing them from cracking and deformation under pressure.
- Slab foundation:This foundation is a solid concrete slab that is poured before I love you. It is suitable for spores grown on heaving soils, where there is a risk of uneven settling. 10 mm reinforcement is used for the reinforcement mesh, which distributes reinforcement throughout the entire surface of the slab, preventing cracking and displacement.
Preparation of the plot for the foundation
Before starting elnykh works respectfully correctly prepare a plot in which sporuda will be raised. Stages of preparation include:
- Layout of the territory:Right away it is necessary to accurately lay out the future foundation. For what purpose do we need to make some scraps and a motuzka? Particular attention is paid to the correct geometry - the foundation must be level and symmetrical.
- Soil excavation:Dependent on the type of foundation, either a trench is dug around the perimeter (for a stitch foundation), or for supporting ones stoppiv (for frequent stop). The depth of the trench for light spores does not exceed 60 cm.
- Laying a cushion:A 10-15 cm gravel cushion is laid at the bottom of the trench. This ensures drainage and protects the displaced soil from foundation. Sand and gravel are well compacted, after which the surface is leveled.
Reinforcement of the foundation with 10 mm reinforcement
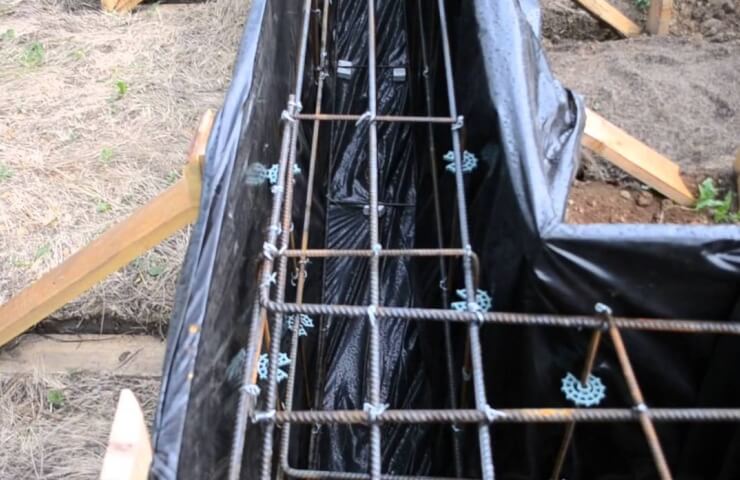
For light foundations, reinforcement with a diameter of 10 mm is amazing By choice, the pieces are sufficient for small installations and easy to install. Let's take a look at the process of reinforcement on the butt of a strip foundation:
- Preparation of reinforcement:The reinforcement is cut accordingly until the trench is complete. For late reinforcement, reinforcement bars should be laid in length, which indicates the strength of the foundation, and for transverse reinforcement, cut in lengths of approximately 30 cm.
- Creation of reinforcing mesh:Later bars are laid three rows, depending on the height of the foundation. Between them, through the skin 30-40 cm, a transverse connection is installed. All the elements are creased together like an irritant. This mesh gives the concrete additional strength and protects it from cracks under pressure.
- Installation of reinforcement in the trench:The finished reinforcement mesh is installed on special stands (plastic or metal ), so that she was known to some distance from the bottom of the trench. This is to ensure that the reinforcement is covered externally with concrete and to protect it from corrosion.
Formwork and pouring concrete
To harden the concrete, formwork is installed in place - either wood or metal structures that form the boundaries of the future foundation. The formwork must be strong and securely fastened so as not to deform under the concrete.
After installing the formwork and laying the reinforcing mesh, you can proceed before pouring the concrete. The concrete is evenly distributed along the entire perimeter of the foundation, after which it must be compacted thoroughly to remove damaged bumps. For this purpose, you can use a vibrating plate or reinforcement to prevent leakage.
Taking care of concrete
Concrete must be hardened step by step in order to gain the necessary strength. In the first days after flooding, it is necessary to periodically peel, especially in hot weather, to prevent the appearance of cracks. The final hardening of the concrete takes about 28 days, after which you can begin to build the walls.


